HOME: WHITEWASHING OUR FIREPLACE

It’s been seven years in the making but we finally painted our fireplace! Ever since we moved in to this house I knew I wanted the brick painted. The tone of the brick was just too red and just didn’t match my blue and white aesthetic. And let me tell you, I one hundred percent wish we had done this sooner!! Painting this fireplace white makes this space feel bigger and brighter – which is exactly what I was hoping for. 

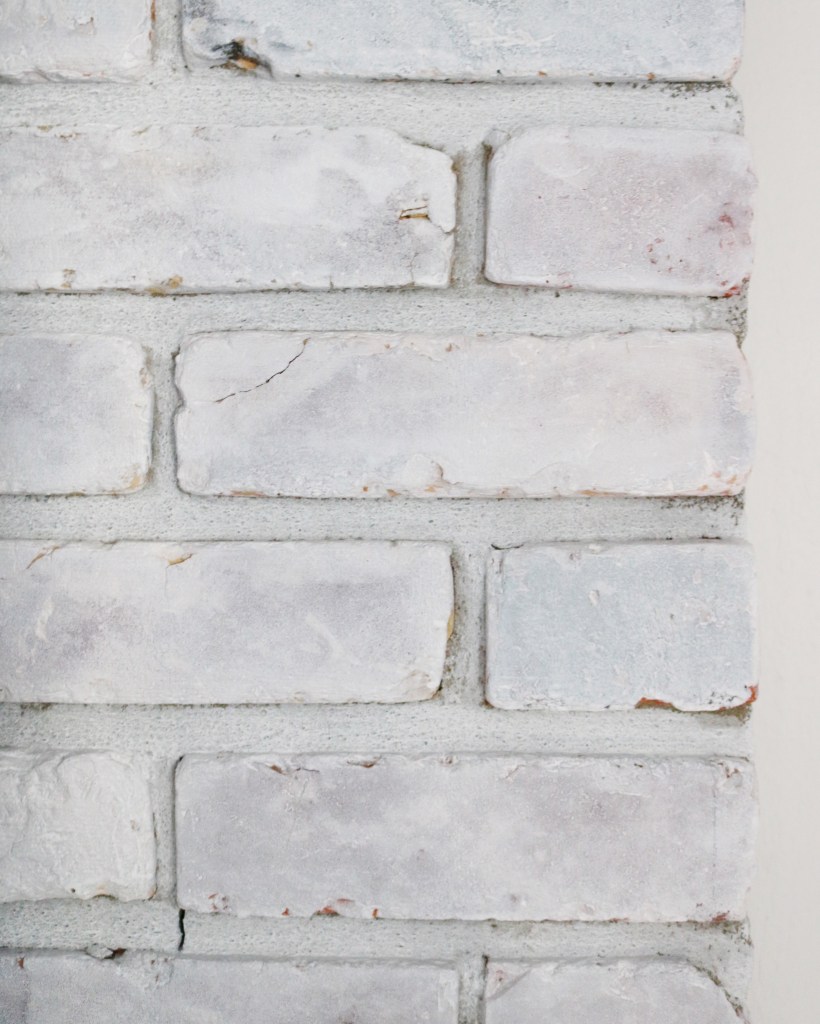
I did a lot of research on Pinterest just to make sure whitewashing was what I wanted. I will admit I was worried about choosing white (opposed to gray or navy) since our walls are already white. But the imperfection of the whitewash technique actually adds some texture and dimension and I just love how it looks against the white walls. I’m not sharing a ton of pictures because the overall space isn’t done yet. We hope to install some white shelves on either side of the fireplace so I’ll share a follow up post once that project is done (which could be many months or even a year).


In the meantime I’ll share the tools, supplies and process I used for the whitewashing! It actually was a very easy and fun project!

TOOLS AND SUPPLIES

(We had a Lowe’s gift card so everything I bought I was able to find there)

Valspar Ultra White Latex Interior Paint and Primer (I went with eggshell because I didn’t want it too shiny)

2-3 paint brushes (latex flat paint brushes)

2 buckets (one for mixing paint and water and one for just water)

1-2 sponges 

Spray bottle with water

Towels/Sheets to protect the floors and wipe up any drip

Painters Tape

PROCESS

I did some research prior to painting, but really I was banking on my friend Erin (who is an artist and who has done her fair share of home renovations) to lead the way. I sent her a simple process that Home Depot has on their website and we went from there.

Step 1: Cleaning and Prepping the Space

The day before we painted I primed the area by cleaning the brick with a gentle multi-purpose cleaner (I used my Branch Basics Spray) and a rag. After I cleaned each individual brick I vacuumed the entire area with the vacuum hose. This took me about an hour.

I then set up the painters tape along the perimeter and made sure I had enough towels and sheets to cover our hardwood floors. 

Step 2. Mix the Paint

A couple minutes before Erin arrived I mixed the paint and water together. I started with a 50/50 mix but quickly realized that was going to be too opaque for my liking so I added more paint to make it about 70% paint and 30% water.

Step 3: Paint the Bricks!

I technically didn’t watch the video I sent Erin from Home Depot but she did (thank goodness!) so she knew exactly what to do. We ended up only using paint brushes and painted each individual brick and all the mortar by hand. 

We would wet a couple of bricks at a time with a spray bottle of water and then use a paint brush to apply the paint. We would immediately use a wet sponge (we had one bucket of just water) to even out the paint and catch any drips. We ended up putting on two coats and then I went through and applied touch ups as needed. In between the first and second coats we identified only a handful of bricks to keep more opaque than the others and taped those off so we wouldn’t paint over them. This allowed us to create a nice pattern throughout the fireplace.

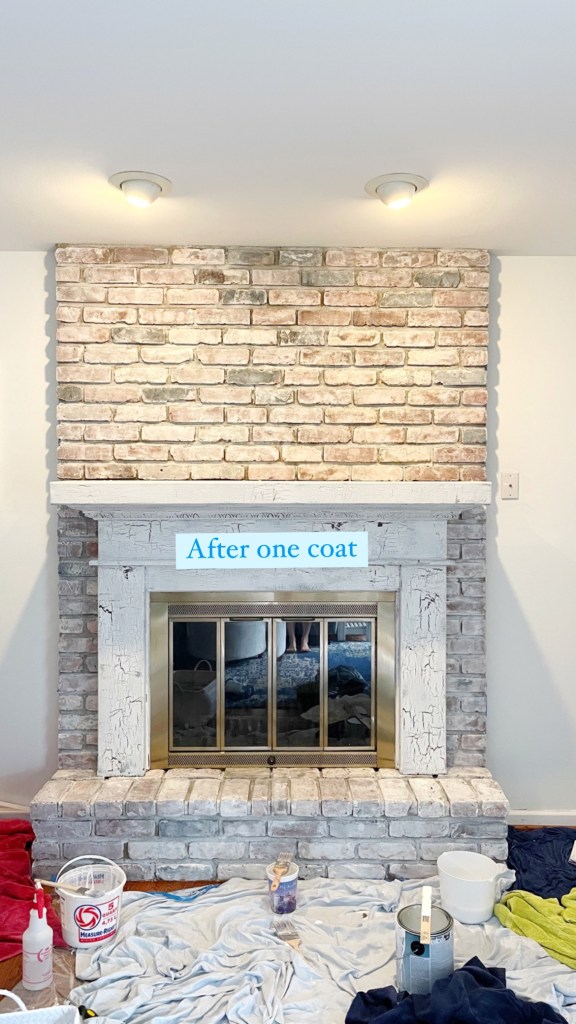
The painting portion took us about two hours, which included small breaks since our kiddos were playing and were very curious as to what we were doing.

And I think that’s about it! If you are on the fence about painting your brick fireplace I say do it!!! Especially if you have a small space like we do. The white completely brightened and enlarged our family room and I really couldn’t be happier.

Next up: adding shelves to either side of the fireplace! 

Thanks for all the encouragement and excitement over this project! There is nothing I love more than decorating our home and making it feel like home. 

Sláinte,

Shannon

HOME: HOUSE PROJECTS 2021

If you’ve been following along for a while, you may have remembered our laundry list of home renovation projects for 2020.  We made a pretty big dent in that list over the summer and through the fall.  Unfortunately, we did not complete all of the projects on our list so some have transferred over to our projects for 2021, making it a very ambitious list.  

But as any homeowner knows, owning a house means there is a never ending list of projects and renovations that must be done.  Luckily the 2021 list is a bit more glamorous than last year’s list (no more chimney, dry wall, or roof repairs!).  We are aware this is quite the list, but we are going to take each project one at a time and see how it goes!

House Projects 2021

  • Paint the exterior of the house (I think I’m still leaning towards navy)
  • Install a new front door (If we go navy for the exterior, I’m thinking white, natural wood or light pink for the door)
  • Install light fixtures and ceiling fans in the upstairs bedrooms
  • Install new carpet on the stairs and second floor
  • Transition Lilly from her nursery to a big girl room (I have very mixed feelings about this!)
  • Organize and tidy up the laundry room and basement 
  • Landscape around the exterior of the house
  • Plant a flower garden (I’m MOST excited for this project!)

I’m sure this list will change and evolve as the year progresses, but it feels good to have some ideas and goals written down on paper.  I’ll share the progress of all of these projects on my Instagram, so be sure to follow along! 

Slainte,

Shannon 

HOME: HOUSE PROJECTS 2020 UPDATE

A few weeks ago I shared a list of house projects for this summer.  We are in full swing in getting these projects complete and that is such a good feeling.  We still have a very long way to go, but we are slowly checking the big projects off our list.  If you are interested, keep on reading to see what projects we have completed and what projects are still works in progress.  

COMPLETED PROJECTS

It feels good to check the not-so-glamorous projects off our list.  So far this summer we’ve been able to spruce up the landscaping, repair the chimney, and replace the roof – the top priorities on our list (and the most money sucking eeeeek).  Relaxing at night is much more enjoyable though knowing that the chimney isn’t going to fall over and the ceiling isn’t going to leak anymore.  

We chose pretty dark gray shingles for the roof and already it enhances the curb appeal so much. We think it will look so good against the (eventual) dark navy siding. Which leads me into our uncompleted list of projects.

WORKS IN PROGRESS

The two big projects we still have to complete are painting the exterior of the house and fixing the interior damage caused by the chimney.  I’m a little concerned about the interior damage getting complete because of, you know, COVID-19.  I’m just not comfortable having workers in our home while the pandemic is raging around the state, country, and world.  Eventually though the ceiling will get repaired and the walls painted and our family room and guest room will feel so clean and fresh. 

I’ve now added a few more interior projects to keep me busy (like I need any more projects in my life).  If you follow me on Instagram you will have listened to me chat about the playroom gallery wall I’m working on.  My goal with the playroom gallery wall is to find original artwork created by artists I admire and/or artists that have become friends.  So far I have five original pieces and I’m deciding on one more (blog post coming soon).

I also decided to finally start the gallery wall up the stairwell.  For YEARS I’ve talked about doing a gallery wall of family pictures going up the stairs (one of my favorite shows of all time is Brothers and Sisters and Sally Field’s character had the best gallery wall up her staircase.  Ever since then, I’ve wanted to do the same thing).  And I’ve finally decided to do it.  It’s definitely a challenging project – trying to style and organize multiple frames on an incline is not easy.  It’s like putting together a puzzle and it just takes time to make all the pieces fit.  Once it’s done, I think it’s going to really brighten up and make our entryway feel so warm and welcoming. 

I’m really looking forward to completing both those gallery walls.  Artwork brings me so much joy and helps make our house feel like a home. 

Thanks for following along on our home reno projects!

Slainte,

Shannon 

HOME: HOUSE RENOVATIONS SUMMER 2020

The joy of home ownership.  We definitely love owning a home.  A home allows us to create a space that is all our own.  But it’s also a money sucking time commitment.  Built in 1976, we bought our house in 2016.  The owners prior to us kept the house updated and modern, which has resulted in minor cosmetic changes on our end.  

For the past year we’ve been dealing with some issues with our chimney.  Long story short, our chimney base has disconnected from our house and water has been seeping into our family room.  This has caused water damage in our family room ceiling, as well as our guest room ceiling. 

We’ve had engineers, masons, contractors, insurance agents – you name it – out to our home to look at the problem and the damage it has caused.  We have finally hired a contractor who will be building up our foundation to connect it back to the chimney and hopefully fix this problem for good.  But because this chimney problem has caused so much interior and exterior damage, we have decided this summer is the summer of value adding projects.

New Roof

We were told when we bought the house that the roof would need to be replaced in five-ish years.  We decided that since we are already working on chimney and foundation repairs, we might as well replace the roof while we are at it.  We are going with dark gray shingles to better suit another project – painting the exterior!

Painting the Exterior Siding 

Our exterior siding is currently blue with black shutters and a white garage.  We’ve always wanted to paint the entire exterior navy and then replace the black shutters with white ones.  I’m currently researching paint colors and Hale Navy seems to be a favorite among many.

Painting the Family Room and Guest Room

Because of the interior water damage, we have to replace some of the drywall and ceiling and will need to repaint both of the family room and upstairs guest room.  Our family room is currently a grayish blue and the guest room is beige.  Because the family room has no windows and only sliding doors to the deck, I’m switching the paint color to bright white to try and brighten it up.  Our guest room isn’t really a guest room right now – it’s more of a hodgepodge of random items.  But eventually, Lilly will probably move in there so my plan is to paint it white for now and then later we can add some color above the chair rail. 

Landscaping

We have a large deck right off the back of the house and one of the previous owners planted some very lush gardens.  Unfortunately, the gardens are extremely hard to maintain and four years in this house has still not resulted in getting them cleaned up.  This year though we are committing ourselves to clearing out the gardens – literally everything and just mulching them.  Next year we will plant native, low maintenance plants to spruce things up. 

These are the main projects, but we are also hoping to replace our front door and purchase a comfy reading chair for our living room.  Plus, we want to finish the playroom by purchasing some fun artwork.  

Phew.  I feel tired just typing all of this out.  Although these aren’t glamorous projects, they will increase the value of the home and we won’t have to deal with any more water issues! Stay tuned for updates along the way!

Slainte,

Shannon